SolidWorks2010 making twist drill model
2025-09-27 00:12:43
In this paper, we utilize the SolidWorks modeling function to create a 3D solid model of a twist bit. The following section outlines the detailed modeling process for better understanding and reference.
**1. Creating the Initial Sketch**
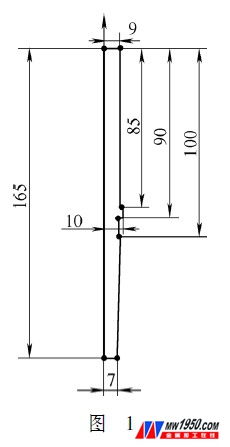
Start by opening SolidWorks and selecting "New," then "Part," and click "OK." Choose the "Front Plane" as your sketching plane in the feature tree. Enter the sketch mode by clicking "Sketch," and draw the initial profile shown in Figure 1 based on the coordinate origin. Once the sketch is complete, exit the sketch mode. Next, click the "Revolve" icon from the feature toolbar to open the "Revolve" property manager. Select the line from the sketch as the rotation axis, choose "One Direction" for the rotation type, enter 360° in the angle field, and click "OK" to generate the revolved body.
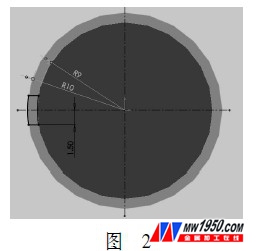
Then, select the top reference plane in the feature tree and draw the second sketch as shown in Figure 2. Click the "Extrude Boss" icon to access the "Boss-Extrude" property manager. Choose the sketch as the profile, set the direction to "Form to Next," keep the default "Merge Results" option, and click "OK" to complete the extrusion. This forms the twisted shank flank.
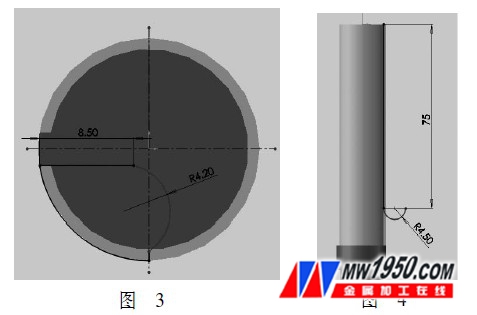
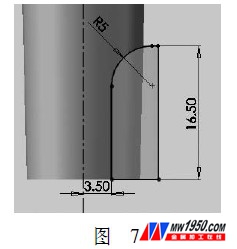
Next, draw another sketch on the top reference plane, as shown in Figure 3. Then, sketch along the side of the boss (twisted shank) as depicted in Figure 4.
Now, click the "Cut-Scan" icon to open the "Cut-Scan" property manager. Set "Contour Scan" as the default option, select "Sketch 3" as the path and "Sketch 4" as the contour, and click "OK" to complete the creation of the twist groove.
**2. Establishing the Base Plane**
Click the "Datum Plane" icon on the toolbar to open the "Datum Plane" dialog. Select the other side of the boss (twisted shank) as the first reference, and set the angle to 18°. For the second reference, select a straight line on the spiral groove and the minor flank face of the twist drill, and set the relation to "Coincident." Finally, click "OK" to complete the base plane creation.
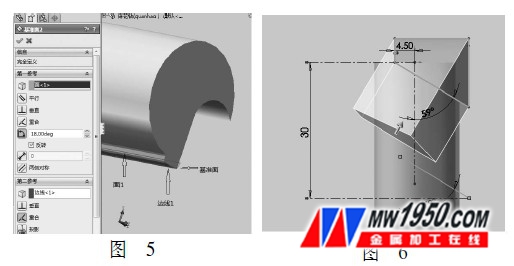
Draw a new sketch on the created datum plane, as shown in Figure 5. Click the "Rotate Cut" icon to access the "Cut-Rotate" property manager. Select the lower line of the sketch as the rotation axis, set the rotation angle to 80°, and choose the upper contour as the cutting outline. Click "OK" to complete the cut.
Next, select the front reference plane and draw a sketch as shown in Figure 6. Use the "Extrude Cut" icon to access the "Cut-Extrude" property manager. Choose "Sketch Datum" as the profile, set both orientations to "Full Through," and click "OK" to complete the cut and shape the flat tail.
**3. Finalizing the Model**
To complete the full twist bit, use the "Circumferential Array" feature. Select the solid axis as the array axis, set the angle to 360°, and enter 2 instances. Ensure equal spacing and select the features to array: "Extrude," "Cut Scan," "Cut Rotate," and "Cut Extrude." Click "OK" to finalize the other half of the flank, groove, and flat tail.
Next, use the "Bend" feature. Set the bend type to "Twist," select the array feature as the object to bend, and input the twist angle as 360°. Define the crop planes and rotation origin with specific coordinates, and apply a rotation angle of 270°, 0°, and 150°. Click "OK" to complete the bending operation.
Finally, apply rounded corners using the "Fillet" tool. Choose "Equal Radius" and set the radius to 0.2 mm. Select the sharp edges of the twist drill and click "OK" to complete the final rounding.
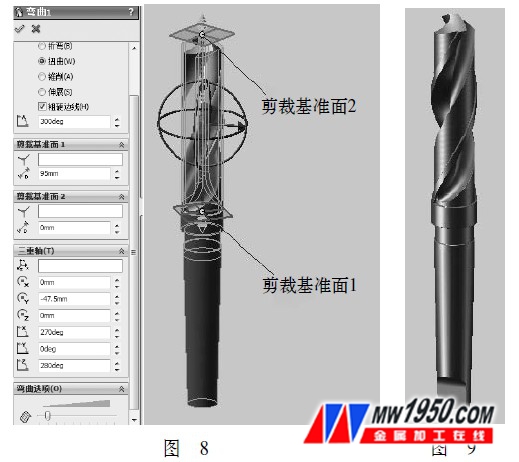
At this point, the complete twist drill model is ready. To enhance its visual appearance, go to the main menu, select "Edit," then "Appearance," and finally "Color" to assign realistic material colors, as shown in Figure 7.
Function and Application
The primary function of a car winch is to provide a reliable means of recovery when a vehicle gets stuck. In scenarios such as driving through thick mud, deep snow, or soft sand, where a car's wheels lose traction and become immobilized, a winch can be a lifesaver. For example, if you're on an off - road adventure and your SUV sinks into a muddy pit, you can attach the winch cable to a sturdy tree or a large boulder. The winch then uses its mechanical power to pull the vehicle out, gradually reeling in the cable and bringing the car to stable ground.
Beyond vehicle recovery, car winches are also useful for towing other vehicles or heavy loads. In the case of a breakdown on a remote road, a winch - equipped vehicle can tow the disabled car to a safer location. They can also be used in industrial or agricultural settings to move equipment or materials.
A car winch is a highly practical and essential device for vehicle owners, especially those who frequently engage in off - road driving or need to handle heavy - duty towing tasks. This compact yet powerful machinery is designed to be mounted on various types of cars, from rugged off - road 4x4s to utility vehicles.
Function and Application
The primary function of a car winch is to provide a reliable means of recovery when a vehicle gets stuck. In scenarios such as driving through thick mud, deep snow, or soft sand, where a car's wheels lose traction and become immobilized, a winch can be a lifesaver. For example, if you're on an off - road adventure and your SUV sinks into a muddy pit, you can attach the winch cable to a sturdy tree or a large boulder. The winch then uses its mechanical power to pull the vehicle out, gradually reeling in the cable and bringing the car to stable ground.
Beyond vehicle recovery, car winches are also useful for towing other vehicles or heavy loads. In the case of a breakdown on a remote road, a winch - equipped vehicle can tow the disabled car to a safer location. They can also be used in industrial or agricultural settings to move equipment or materials.
Electric Car Winch,Heavy Duty Winches,Portable Car Winch
JINHUA RUNYE TECH. CO.,LTD , https://www.irunwinch.com